Dragon Tree Bonsai: A Nursery Specializing in Tropical Trees


Styling a Podocarpus
By Robert Pinder
I am presenting a photo essay of styling a podocarpus macrophylla ‘maki’, common name Japanese Hew. This is one of four specimens that I have been growing since the early 80s from seedlings. They have always been growing in containers up to a 25 gallon nursery pot. In 2001 they were topped to encourage base branching and subsequently the soil ball was reduced to about 1/3.
This is a joint (ad)venture with my good friend Pat Giacobbe, who always enjoys sharing his artistic insights, and myself.
Since a picture is worth a thousand words, and this is a photo essay, any commentary will be brief.
Begin December 2008:
We chose a bushy, healthy and vigorously growing plant. This is a good time of the year in Florida to work on podocarpus.
Pat was looking for a best view for the final tree.
We took a close look at the root formation and distribution and started formulating our plan.
We made the second cut and got a good look at this outstanding base of the trunk and roots.
We made major branch selection.
The right side of the tree was now exposed. The decision was made to develop a live apex, so a large portion of dead wood was removed.
Branch selection was made for the left side of the tree and some wiring was done.The tree was positioned to take full advantage of the new apex.
Initial styling is complete and we get a good look at the future tree.
Next step is to remove old soil. The fibrous roots are textbook!
A deep pot was selected to allow for future growth. 1/2 inch of turface was put on the bottom. The potting medium is 50% turface and 50% nursery mix that has lots of pine bark.
Right side
Notice large cut and odd growth of apex.
Left side
Guide wire is used to position branches
Podocarpus Macrophylla ‘maki’
(common name Japanese Hew)
Is native to China and Japan. It likes direct sunlight. Too little light will result in large, elongated needles. In very sun-intense areas, Podocarpus may suffer leaf-burn if not given shade during the hottest part of the day. Thrives in temperature zones 7 through 11. Likes slightly moist soil, but be sure to provide adequate drainage. Gray needles are a sign of overwatering. Daily misting is appreciated. Podocarpus take a while to re-establish a strong root system, therefore be patient between repottings. Also, repottings and root pruning should be done in the cooler months, November to March. Be aware that aphids are often a problem on new growth.
Here we have the proud designers with the newly styled and potted podocarpus.
“We are smiling!"
September 2009…
Only long sprouts were removed to encourage back branching. Jins and shari remain to be finished.
However, the plan is to allow the tree to grow for another year before any major work is done. At this time there is nothing dramatic about this tree from a styling point of view. However, its beauty lies in its subtle display of strength (massive root base and large trunk) and proportion.
Summer 2012
Epilogue:
By Patrick Giacobbe
Here is a perfect example of creativity and craftsmanship coming together. The overall composition was decided before any cuts were made. The basic rules were not able to be adhered to and that’s when creativity kicks in and the rules/guidelines have to be muted.
A beginner’s guide to root-grafting ficus
Root Grafting
A “What for? and “How to” Guide
by Robert Pinder, Dragon Tree Bonsai
Do you ever look at one of your trees and realize that it has all the credentials to become a masterpiece? The branches are in the right places, the apex lines up and there is movement and taper up the trunk and through the branches. You think, “I’m going to put this beauty into a fine bonsai pot.” So you start checking the root structure and base taper. “Darn! This is one ugly nebari (root structure) and it looks like a little (or a lot) of reverse taper on the lower trunk. What can I do to fix this?”
An ugly nebari is one that has one or two large roots coming right out of the front or the back of the tree. There are other criteria but for this article this one will suffice. Because of the poor root placement there is very little flair at the base of the trunk when you are looking at the front of the tree. This needs to be fixed to make the masterpiece complete.
You can enhance the root structure (nebari, placement, etc.) and also create more taper at the base of the tree trunk by root grafting. The principle of grafting plant parts is the same – matching cambium with cambium. Read up on it if you are not familiar and practice cutting and joining on discarded branches. Now that we have practiced, our technique is perfect and our confidence is sky high, let’s go to it.
Your tree should be healthy and preferably it’s the beginning of the growing season. Do not prune back your tree. You want to keep the flow of sap from roots to trunk to branches to leaves at its optimum. Select a piece of root of the same variety as the tree onto which you are going to graft, e.g. Nerifolia on Nerifolia, Green Island on Green Island, Retusa on Retusa, etc. Just like the bark is different on these varieties of Ficus so is the root coloration and texture when exposed and weathered. The thickness and length will vary according to what you are working with and what you would like to accomplish (that is fixing nebari or adding taper). However, try to get as many fine roots as possible. Keep your root pieces wrapped in a damp towel so that they don’t dry out.
Now we are ready for the surgical part. Hands steady!! I like to use a box cutter or a carpet knife that has a long handle for a good grip and a short, sturdy, sharp blade for a clean cut. At a point on the trunk where the root graft angles from the trunk to a little below the soil make a cut in the bark a little smaller than the diameter of the root. Remove the piece of bark. Shape the end of the root graft so that it fits the angle of the trunk. Now put the two together. It is critical that the top and bottom of the root graft fit tightly with the trunk. This allows the continuation of the upward flow of sap. That means success and vigorous growth – and that masterpiece you are after.
Once you have the right fit at the graft union, you need to fasten them together so they stay that way. First I put tree sealer (soft type) around the wound to keep water out and also to prevent the bark (cambium) of both root and tree from drying out. Depending on the thickness of the root, its flexibility and placement on the trunk, I use wire with a piece of tubing, elastic or a nail. If you use a nail get one that is long and slender with a head on it. Do not use copper or aluminum nails. Now that everything is secure add some more tree sealer around the entire wound. Make sure the fine roots are covered with soil. Cover the entire root graft with a damp towel. Tomorrow you can water thoroughly making an effort not to get water in the graft union.
Since your bonsai get better with time, time is in your favor, so don’t be in a rush to poke and prod at your new graft. Two, four, six months or a year can pass. Take care of your tree. When the graft union starts to swell and the root begins to thicken then you can smile and brag about your success.
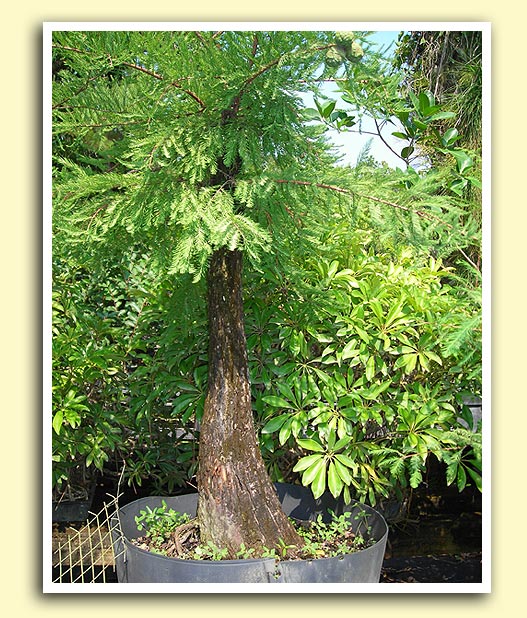
Bald Cypress
Bald cypress is an all-time favorite for bonsai enthusiasts in Florida and rightly so since they grow from the south mainland through our northern border. Although is grows far south in our wetlands, it is not a tropical tree.
The temperate genetics of the cypress require that it go through a rest period and it goes deciduous in the winter. It has a different metabolism, if you will, than that of tropical trees. During dormancy and the first few weeks of re-foliating, it is dependent entirely on food reserves stored in its trunk and large roots.
Now enter the collectors and/or enthusiasts. We hack away most, if not all, of the feeder roots and eliminate all but a short stump for the trunk. Think about what this does to the food reserves. For long term success, your first priority is to re-grow your tree and rebuild its food reserves.
To this end a newly collected or heavily root pruned tree, especially older specimens, should be allowed to grow unchecked for two or three full cycles of the seasons (2+ or 3+ years). A good indication that all is well is that you will have one or two vigorously growing leaders. This indicates that there is a good flow within the tree from apex to feeder roots.
Do not over-prune your tree when styling. This is particularly critical in the early stages. Remember, the foliage makes the food. However, have a plan. If for some reason you have to do a heavy pruning (restyling, etc.) allow the tree a couple of seasons to re-establish it food reserves.
When repotting, do not indiscriminately cut away large roots. These are the roots for spring growth in which the plant’s food reserves are stored. Maintain a balance between feeder roots and storage roots. Go slow. I allow one full season for growth (minimum pruning) before repotting.
I hope this article has provided some insights that will be helpful in keeping your bald cypress healthy for your enjoyment into the distant future.